Pinned Items
Recent Activities
  • OG GarlicSalt created a new forum post in ATA 49 - APU
    Working on a Hawker 900XP with APU no start and High Oil Temp Light always illuminated.

    In the photo im holding the light test button down just to show the light in question since it was taken after the fix.


    My first time working on the issue but it did have some recent history, twice the high oil temp S/W was replaced and after each replacement the APU start just fine and about 1-2 weeks later dead again. Now it was my turn to take a look and see what I could find.

    I found it a little puzzling at first after reading the WDM and the APU trouble shooting manual seem to contradict each other. As I read the print it looks to me like when the switch is closed the ground is provided to the light causing it to illuminate. Although when you read the trouble shooting manual it reads that the switch is in the closed position when cold and opens when overheated. I will just have to assume that some magic that is not depicted takes place in the APU ECU to make the light illuminate. 


    The first thing I wanted to check was the Lamp test 1 relay in the APU control panel, I was thinking maybe a sticky relay was causing the High Oil Temp light to be on all the time, although thinking about it now even if that was the case it would probably still start just would have the light on but auto shutdown not triggered. Anyway still some findings that helped me out. I found from PIN 1 to ground of the relay was a reading of 3 Mega Ohms and when jumped to pin 5 the light would still illuminate right away. So my next stop is going to be the High Oil temp S/W.


    Oddly enough once I depanled the APU shroud the light went out, at first I was thinking possible chaffed wire touching the shroud or something like that, also the way the back shell was laying the back shell and wiring were both touching the shroud. Before I got to do anything else I started to inspect the plug and was still getting my High resistance reading from the High Oil Temp S/W to the plug. Further inspection and removal of the connector back shell showed me the real problem.


    I just started to unscrew the backshell and found the wires were disconnected from the pins. This should explain our intermittent issues and the high resistance reading earlier. After crimping on some new pins putting everything back together re clocking the backshell and wiring away from the shroud all was good and APU is now starting and running without issues.

    I will have to assume that when the switch was replaced and the plug tightened down again it was just enough to keep it going until it was shook loose once again. 

    Still slightly confused by the wiring diagram but just decided to trust the manual and continue forward and I was lucky enough to find the issue before sinking to much time into it.
    1. View Thread →
    0
    0
    0
    0
    0
    0
    Post is under moderation
    Stream item published successfully. Item will now be visible on your stream.
  • OG GarlicSalt thanked the user Mark in the forum post, Generator Feeder Crimping
    Post is under moderation
    Stream item published successfully. Item will now be visible on your stream.
  • They want to deactivate it while doing as little work as possible, the switch being there won't affect any operations. Agian also easier to reactivate if that is the desire of the operator.
    1. View Reply
    2. View Thread →
    0
    0
    0
    0
    0
    0
    Post is under moderation
    Stream item published successfully. Item will now be visible on your stream.
  • OG GarlicSalt created a new forum post in 3D Printing
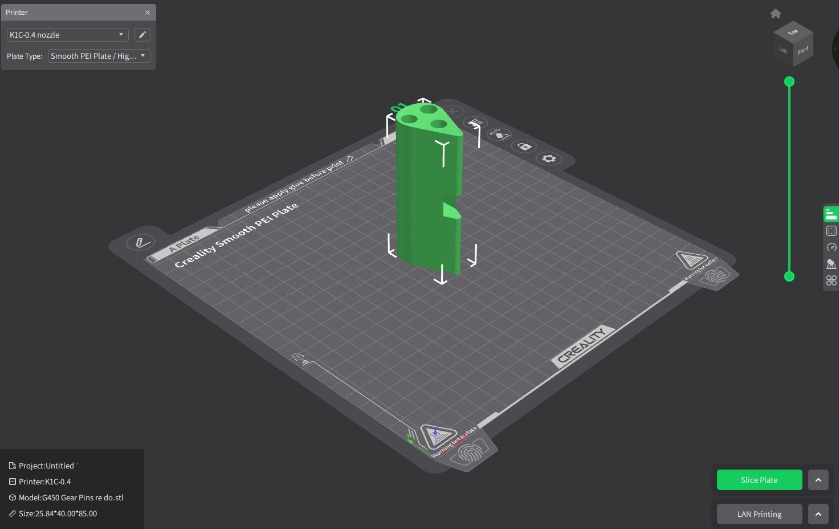
    Was getting sick of digging through the bag of pins in the door for the gear pins, so I created a 3d print model of a gear pin holder to make them easier to find. Made like the ones that come on the 650 not sure if this originally came with the aircraft and was lost or they never had one. Either way this fits the pins quite well, will have to see how it holds after time may need to change material after all the hot and cold cycles.

    Printed : PLA
    Print Time : 1:45
    Print Cost : .25 


    File Download
     

    File Attachment:

    File Name: G450GearPins.zip
    File Size:134 KB
    1. View Thread →
    0
    0
    0
    0
    0
    0
    Post is under moderation
    Stream item published successfully. Item will now be visible on your stream.
  • OG GarlicSalt replied to the topic WDM-INOP in 737 Classic
    With the diagram you have shown the airstairs are deactivated most likley by operator request. Either they aren't using them to costly to maintain or any combination of those to.

    Deactivation through pulling the CB and applying permanent collar is much easier(cheaper) for MX and also makes reactivation easier if they decide to go that route.
    1. View Reply
    2. View Thread →
    0
    0
    0
    0
    0
    0
    Post is under moderation
    Stream item published successfully. Item will now be visible on your stream.
  • OG GarlicSalt replied to the topic WDM-INOP in 737 Classic
    No the C/B are pulled with a permanent collar usually red.
    1. View Reply
    2. View Thread →
    0
    0
    0
    0
    0
    0
    Post is under moderation
    Stream item published successfully. Item will now be visible on your stream.
  • OG GarlicSalt replied to the topic WDM-INOP in 737 Classic
    Yeah it's disabled inop because C/B collared.

    Never personally seen a 737 with airstairs i have seen some BBJ and other wide body equipped with them as option or Modification after the fact.

    Probably disabled because they no longer need it or want to maintain it.
    1. View Reply
    2. View Thread →
    0
    0
    0
    0
    0
    0
    Post is under moderation
    Stream item published successfully. Item will now be visible on your stream.
  • OG GarlicSalt replied to the topic WDM-INOP in 737 Classic
    Would like to see it here to be for sure but to me sounds like the triangle (a flag) is showing that a component is inop at time of installation. You will see these or similar alot of STC or engineering drawings for new installations as components will he installed wired up tested but then be INOP or unusable until final approval from authorities. Then revision will be made and inop flag removed.

    Could be other reasons but that's the only one I can think of.
    1. View Reply
    2. View Thread →
    0
    0
    0
    0
    0
    0
    Post is under moderation
    Stream item published successfully. Item will now be visible on your stream.
  • OG GarlicSalt created a new forum post in 3D Printing
    I found it very annoying installing the pitot static covers on G650 aircraft especially while on the road. The upper Pitot static ports are just out of reach end up trying to stand on a chock my shirt gets un tucked ect. The gulfstream tool is way to big comes on a giant pole have to store it in the cargo and we are typically max load. I have found this tool much quicker and more convenient. I added an extra extension in case you are shorter. This is version 1 of this tool, I would like to design a handle that folds or extends in and out to make it quicker easier and smaller, but still testing different ideas. I printed mine out of ABS plastic for strength but i feel that any type would be suitable for this print.

    Print time: 6:00
    Print Cost: $2.00
    Plastic Type: Any


    File Attachment:

    File Name: PitotCoverV1.zip
    File Size:266 KB


    1. View Thread →
    0
    0
    0
    0
    0
    0
    Post is under moderation
    Stream item published successfully. Item will now be visible on your stream.
  • OG GarlicSalt created a new forum post in 3D Printing
    Here is a simple tool to help you loosen a cannon plug in a high density area. This should allow you to remove just the cannon plug that you want without having to losses all others just to reach the one that you want. This needs to be printed in either ABS plastic or Nylon/Carbon, PLA is to weak for this application. This is the first iteration of the tool I have seen these before but as I use it I will update the file and try to improve form factor and strength. 

    Print time - 1:20
    Print Cost - $0.22

    Based on -  thrustaviation.co/ols/products/cannon-plug-strap-wrench


    File Attachment:

    File Name: StrapWrenchV1.zip
    File Size:30 KB


    1. View Thread →
    0
    0
    0
    0
    0
    0
    Post is under moderation
    Stream item published successfully. Item will now be visible on your stream.
There are no activities here yet
Unable to load tooltip content.