Rear release plugs are found on newer generation digital aircraft. They have proven to be reliable against moisture and chemicals. The face of the plug will be a hard plastic material as compared to rubber on front release plugs. Both types of plugs use locking tabs around each pin. The tabs must be spread open for the pin to be removed. Rear release pins do not have a taper. Locking tabs engage the shoulder to keep the pin in place.
The standard ranges of pin sizes are red, blue, and yellow. Red pins for gauges 18-22 receive the majority of use. The most common purpose is for signal wires. The larger blue and yellow pins are found for power functions. It is not uncommon to find intermixing of pin sizes in the same plug.
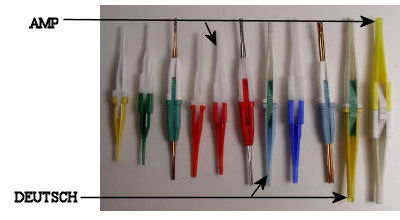
Plastic or metal insertion/extraction tools are required to work on rear release pins. The tools are made by Amp® and Deutsch®. Both manufacture's plugs are used extensively throughout aircraft avionics/electrical systems.
Quick Notes on Rear Release Plugs
- All removal/insertion tools are color coded for pin size. The white side is used for removal. The colored side is for insertion. Deutsch tools are cylindrical at the midpoint. Amp's have a square shape
- One major hassle with removal tools is placing the wire “in the tool”. If the wire length is available, it can be “walked in” from the gap further back on the tool body.
- A considerable amount of skill is needed to remove pins from some rear release plugs. The main problem is seating the tool fully around the pin shoulder. As with front release, if the tool is not fully seated the tabs will not release and the pin cannot be removed.
- There are many occurrences in which one type of tool works better than the other. If an Amp tool doesn’t seem to work, better luck may be found with a Deutsch.
- The majority of the time the tool will stop at the pin base. It can be tilted along the length to help get over the base. A good seat can be "felt" with your fingertips.
- Plastic extraction tools cannot be rotated left/right after placement in plug. If a good seat is not made, remove the tool and reposition before inserting again. If a tool is rotated, it will break. If any pieces are left in the plug that cannot be removed, the whole plug will need to be rejected. Any stray plastic pieces will prevent a tool from seating and the tabs will remain engaged.
- I will use the metal tools as a last resort. The metal tools shown here along with the tweezers type can easily damage the locking tabs if they are not used properly.
- Female pins without wires can be assisted out of the plug with a paper clip or stick pin from the front side. The push rod from a front removal tool is helpful with male pin removal. The rod tip is concave, it can push the pin up enough to grab the base from the backside (fingers only, do not use pliers).
- Rear release plugs usually have little resistance to pin insertion. If a pin has a wire attached, the wire is normally all that is needed for insertion. A click will be felt when the tabs engage. A slight tug on the wire will verify the pin is locked. Blank pins need the tool to be inserted.
Plug Numbering and Replacement
- All plugs that use letters for pin identification do not use “I”, “O”, or "Q".
- Plugs that use numbers for identification will have parentheses “( )” around every tenth digit.
- Plug replacement requires extreme care. Any mismatch of pins can be cause for headaches when trying to verify the mistakes. I do not follow the letters or numbers around the plug. Most plugs will have the pins aligned in rows. It is much easier to start at one edge and do one row at a time. This prevents problems near the end of the plug change, trying to stab pins into the middle with wires all around. Each pin needs to be double, and then triple checked before moving on to the next one.
- Placing pins in the unused positions will help the “next guy down the line”. If a pin is needed but not available in the shop, a spare can be used from the plug itself.